Image courtesy of TCGdex.net
Alakazam in the Meta: A Look at Key Matchups and Stats
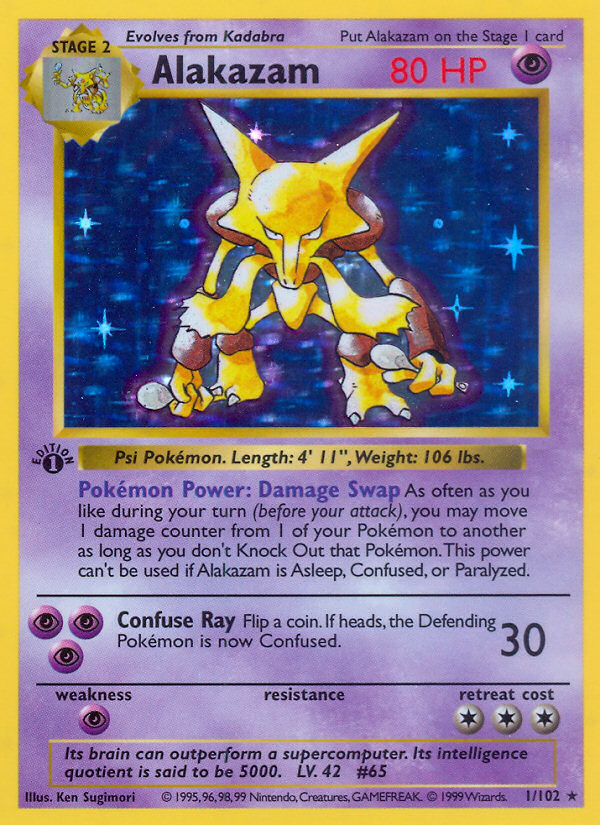
If you’ve ever dusted off a vintage binder and watched Alakazam ripple across the board with quiet, calculating precision, you know that this Stage 2 Psychic powerhouse has never been about raw one-turn power alone. In the Base Set era, where the meta was a tapestry of fast fundamentals and careful resource management, Alakazam carved out a niche by leveraging two signature elements: Damage Swap and Confuse Ray. The former allows you to move damage counters between your Pokémon on your terms, while the latter can turn a risky engagement into a guessing game that tilts in your favor. Ken Sugimori’s art—bold, iconic, and instantly recognizable—still catches the eye on collector shelves, a reminder of the card’s enduring presence in the TCG’s early lore. 🔥
Under the hood, Alakazam is a Stage 2 Psychic with 80 HP, evolving from Kadabra. Its retreat cost sits at three, meaning you’re balancing aggressive tempo with the mana you’ve already invested in mid-game board state. The primary attack, Confuse Ray, hits for 30 damage and flips a coin to potentially confuse the Defending Pokémon. In a meta where even a single confused opponent can stall for crucial turns, that attack is more than a cosmetic effect—it’s a tempo tool that buys you the space to line up Damage Swap shuffles or to sneak a critical energy attachment through. The Damage Swap ability, usable as often as you like during your turn (before you attack), lets you move 1 damage counter from one Pokémon to another, provided you don’t Knock Out the receiving Pokémon. In practice, that means you can steer damage away from Alakazam to a benched partner or evenly distribute a pressure wave to keep your front line alive for another round. It’s a mechanic that rewards careful bench management and precise planning. 🪄
Core Gameplay Archetypes and How Alakazam Shines
Two facets of Alakazam’s design matter most when you’re evaluating it within a meta deck: durability and disruption. The 80 HP stat is modest by modern standards, but in a card pool that rewards attrition and smart damage control, Alakazam can outlast more aggressive lines when you orchestrate the damage flow with Damage Swap and leverage Confuse Ray to complicate your opponent’s decisions. A typical matchup strategy might look like this:
- Open with Kadabra and feather in damage counters to set up your bench for a late-game surge. While Alakazam’s attack costs require three Psychic energies, the control framework provided by Damage Swap lets you redirect incoming damage away from Alakazam as you wait for the right moment to swing.
- Play for Confusion by tempoing a few turns of coin-flip luck on your defensive stand. If Confuse Ray lands, your opponent may waste actions on repositioning or healing, which can swing the pace in your favor even if you’re trading blows in a lower-HP endgame.
- Mitigate Psychic Weakness—your one obvious vulnerability—by spreading your approach across the bench. In a secondary line, you can force your opponent to overcommit resources trying to KO Alakazam, then leverage Damage Swap to protect your more affordable threats.
Matches in the vintage meta tended to hinge on how well players could manage damage distribution and leverage status effects. Alakazam’s strength isn’t a one-card finish; it’s the ability to elongate fights, pressure opponents into suboptimal plays, and then swing momentum with a well-timed Counter Swap or a delayed Confuse Ray that stings at a crucial moment. For collectors, this hybrid approach adds value both in playability and in the nostalgia factor that keeps Base Set cards in rotation among contemporary enthusiasts. 🎴
Key Matchups and Tactical Notes
Understanding where Alakazam tends to shine—and where it struggles—helps you read the matchup statistics that deck builders track for meta decks. Below is a qualitative snapshot of common patterns you’ll encounter when Alakazam appears in a well-constructed deck:
- Against slower, non-Psychic archetypes: Alakazam often enjoys favorable odds when the opponent cannot apply rapid, multi-hit pressure. The ability to move damage counters with Damage Swap and to disrupt with Confuse Ray can limit the opponent’s options, leading to a win rate that edges into the higher teens-to-mid-60s range depending on execution and card draw. ⚡
- Against other Psychic decks: This is where the math gets tight. Your weakness to Psychic means you’ll be trading in a wheelhouse where both players can leverage similar lines. A key is to maximize misdirection—use Damage Swap to run draw-down scenarios where you can reach a timely Confuse Ray flip while keeping Alakazam out of knockout range. Expect closer, grindy games with a lower win probability unless your support Pokémon mount a solid defense. 🔮
- Against early-game fast hitters: Tall HP thresholds and retreat costs compel you to rely on bench depth and energy management. If you can survive the early pressure and survive a big hit, your late-game control can swing the match in your favor, especially when your opponent overextends trying to KO your board. 💎
- Energy and resource discipline: Three Psychic energies to execute Confuse Ray means you’re typically investing two or three turns into setup unless you’re running supportive draw and energy acceleration. Your success rate improves when you can chain energy attachments while you maintain a pinch of board presence through Damage Swap. 🎮
“Damage Swap isn’t flashy, but it’s exactly the kind of quiet engine that wins endurance battles. It lets you keep Alakazam in play while forcing your opponent to commit to a KO that costs extra turns.”
Market Value and Collector Insights
For collectors, Alakazam from the Base Set holds a storied spot. The card is a Rare holo in the Base Set, illustrated by Ken Sugimori, with a timeless silhouette that many players still recognize on shelves worldwide. Pricing data reflects the holo’s continued appeal. Cardmarket shows an average around €36.73 with notable volatility—low prices around €7.99 for off-peak lots and rising trend indicators depending on condition and edition status. On TCGPlayer, holofoil copies trend higher, with a mid price around $52.20 and a market sweep that can reach $100 for prized copies. These numbers underline a broader truth: collectors cherish the card not only for playability in a vintage context but also for its value as a cornerstone in a complete Base Set collection. The card’s evolution from Kadabra to Alakazam, and its place in a 102-card official set, cement its iconic status among early Pokémon TCG lore. 🔥
From a gameplay perspective, the card’s Damage Swap and Confuse Ray tools remain a vivid reminder of the era’s emphasis on resource management and strategic disruption. The Base Set presentation—complete with the base artwork and the holo variants—remains a benchmark for nostalgia-driven decks that blend history with modern collecting sensibilities. If you’re building a persona-driven vintage deck or simply curating a standout holo for your binder, Alakazam’s pedigree and its quiet, methodical toolkit offer a unique flavor among classic Pokémon TCG staples. 🎨
For players who want to connect with this product in the real world, consider the practical companion gear of today, like the Phone Grip Click-On Adjustable Mobile Holder Kickstand—an unobtrusive yet essential accessory for on-the-go strategizing and card review. It’s a reminder that the hobby blends both the tactile joy of card play and the modern conveniences that keep the scene vibrant. Pulling all these threads together, Alakazam’s presence in a meta deck is as much about historical resonance as it is about learning to choreograph a flawless, crowd-pleasing disruption plan. ⚡
Phone Grip Click-On Adjustable Mobile Holder Kickstand